Quick Christmas Decor Ideas

It's that time of year to dig out the Christmas decor, or to add pieces to a collection you might have. Being a bit of a traditionalist when it comes to Christmas decor, I love sticking with basic red, mixed metallics such as gold and silver and black accents to tie it all together. 

My living and dining combined room always gets the royal treatment decor-wise over the holidays, but our family room and kitchen tend to get overlooked. I popped into the nearest Lowe's to check our their holidays collections. They have categorized their collections into Comfort and Joy, Deck the Halls, Cold Spell and Sweet Noel, each creating a different theme for your home. Of course, I like to mix and match, so the collections caught my eye.

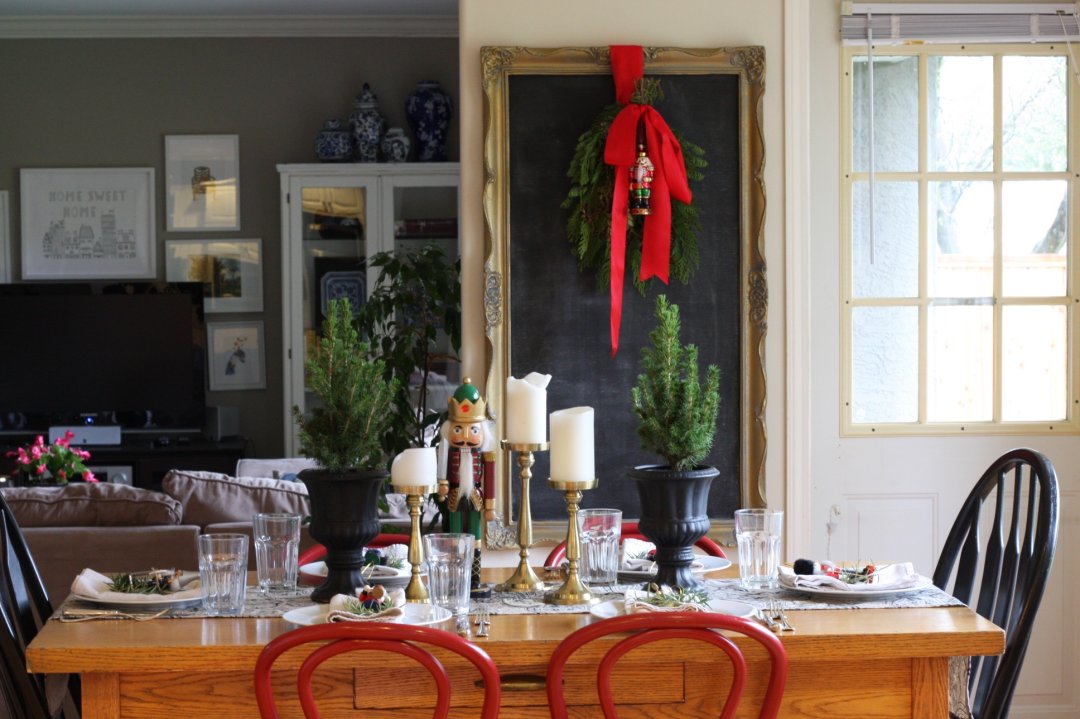
Wanting to add a bit of visual interest to our kitchen table where we enjoy breakfast or lunch when the whole family is home for the holidays, I purchased the gorgeous pillar candleholders along with a nutcracker to add to my growing collection.

Using a mixed bough swag from Lowe's Garden Centre wrapped in a satin ribbon I had around the house, along with a glass nutcracker ornament from the Deck the Halls collection, I added a quick and easy Christmas update to our kitchen chalkboard.


The mini spruce trees were also a find from Lowe's Garden Centre. Popped into some urns I found at a thrift store and spray painted matte black paint, they add some height and greenery to the table.


Clipping rosemary from the garden, I twisted the branch to create a ring, which I tied with some twine from Lowe's hardware section. Voila! I've create min-wreaths to decorate the place settings. Adding my own mini nutcracker ornaments add some visual interest on each plate.


Our family room gets neglected every year, but not this year! The velvet and plaid reindeer pillow from the Deck the Halls collection, along with the reversible metallic silver with a soft fur back from the Cold Spell collection add Christmas cheer to the sofa.

Wanting to jazz up our coffee table, I added the hurricane lantern, glass nutcracker ornament and gold star ornament from the Deck the Halls collection, along with a Christmas cactus found at the Lowe's Garden centre that I simply popped in a plant pot.


Can't wait to get our tree this weekend and finish decorating the rest of the house!


*This post was sponsored by Lowe's Canada, but all opinions are my own

Follow Lowe’s on Facebook / Twitter / Instagram / Pinterest


Holiday Cards from Minted


After ordering beautiful holiday cards last year from Minted, I couldn't refuse the opportunity to order some this year. There are so many designs to choose from on their site,  I wanted gold foil and one design caught my eye immediately. Aren't the simply stunning? I love, love, love them!

An added bonus was that you can get free matching envelopes and recipient address printing as well! You can also customize your cards, by adding a photo collage and a Christmas letter on the inner part of the card. The use quality paper and I appreciated their proofing service. I noticed a few typos which they correct, not only once but 3 times! Proofreading is not my forte.  Now all I have to do is pop the card into the envelope, slap on a stamp and slide it into the mailbox.  


It's still not too late to order yours! 


*I received Christmas cards from Minted in exchange for this post. 

A Quick and Easy Update


We have several pieces of furniture around the house that need a freshening up with some paint. Way back in 2009 when I started my blog, I was a stay at home mom with time on my hands and many pieces received a lick of paint. One piece was a solid pine dresser we bought when my mom moved in to help me out when I was in school full time training to be a teacher while my husband was relocated to the Washington DC area. It sat painted black for the longest time. Eventually I decided to stencil the front and blog about it. Ugh (so embarrassed that I though that stencil was cool and that my photos were blog worthy) and for the past 6 years have regretted that decision. 

With the goal to get rid of some furniture as we hope to down size in the near future, I decided that dresser needed to go and it needs an updated paint job.  FAT paint to the rescue! In the spring I was given some pints of paint from the Amanda Forrest collection, and Navy State of Mind was a perfect choice! Giving the dresser 2 coats of paint, a light sand with some slight distressing on the edges and then 2 coats of wax the dresser is good to go.

I have it listed on several local furniture Facebook sites. Hope to sell it soon.


BEFORE:


AFTER:


Recently I snapped up a gorgeous coffee table for $20 from Craigslist. Can't wait to give it some life with paint. Will share once I am done.

Make sure to pop by later, I am excited to be working with some fabulous brands for the holidays! Think cards and decor! Eek. Excited over here!!!


Fresh & Clean

** Sponsored post **


Lavender has to be one of my favourite plants to grow and to use in my home. I have lavender essential oil which I use along with Castille soap to make my own face wash in soap pump. Lavender helps with stress and aids in sleep. When I was dealing with some sleeplessness I had a lavender sachet under my pillow. That sweet scent was heavenly and helped me relax and sleep.  I also use lavender sachets in my t-shirt drawer and have one hanging in my closet. Every week I scrunch it up to release the oils that scent the air and my clothes.

When Pinesol asked if I wanted to use their latest lavender Pinesol, I was intrigued. It has a nice scent while still has the disinfecting power of regular Pinesol but without that woodsy clinical smell the regular Pinesol has. I used it to clean our master bath, heaven forbid I show you photos of that sad space stuck in the early 90's, but my tub was sparkly clean!


Now if only I have my kids back into the house, so I could pay them to clean the house for me!

XO Barbara

A Itty Bitty Project

So here we are a week after my last post. Major fail in writing a post more than once a week. Not much happening here at our house, but I hope to spruce a few things up for Christmas. If you follow me on Instagram, I shared a quick peek on Instastories!

One itty bitty project I am working on is helping the baby girl with her studio suite trying to make it look more grown up. She graduated from university last spring and has landed herself what she calls a "grown up" job, so to celebrate I am going to be whipping up a few throw pillows for her fabulous sofa she scored from Craigslist. She is updated some hand me down furniture with some paint. Here are the fabrics that I will use to create some fabulousness on her sofa. All fabric is from Tonic Living.

Once I get measurements of the throw pillows she has, I am going to get to work!

XO Barbara

TGIF

Since working full-time teaching kindergarten these past 5 years, my poor blog has become so neglected.  Now that my hubby and I are empty nesters (and I am only in my mid-40's!!) I have time on my hands to focus on my blog AND I need a creative outlet after dealing with kindergarteners ALL day long. As cute as they are, they are a needy bunch and I need an outlet or I might end up drinking myself to death. Oops, did I say that out loud? That darn inside voice just keeps speaking up! BUT I am in need of a better platform (any suggestions out there?), possibly a new URL- thinking of jumping on the bandwagon and just using my name instead of my maiden name that I used for my URL, fix up some of the pages on my blog - finally make a project gallery page just to name a few.

Back to what this post is about. I love what other bloggers do sharing what caught their eye that week, so I am doing the same.

So to celebrate Friday-yay! Here is what has caught my eye this week.

I love, love, love The One Room Challenge. As a guest participant in the early days, I love seeing how far Linda has come with her idea! The guest participants are real fancy pants designers unlike me, so their projects are spectacular! Even my friend Nancy is a guest participant this round!


Lauren Liess created another beautiful kitchen at her dad's lakehouse.


And how I love this newest show on Gusto TV, Canada's Next Designer. The winner wins a designer contract with Ikea! What a dream that would be. And what is even more fabulous is Tommy Smythe is the guest host!

MyDomaine lists 8 Top Designers Who Were Self Taught. I had no idea!

Fingers crossed I can get my blogging mojo back and be back with more regular posts!

Happy Weekend!

Barbara

Vancouver Modern Home Tour

Have you ever driven by a beautifully designed home and wondered what it looks like inside? Now is your chance with the 4th annual Vancouver Modern Architecture and Design Society's Home Tour on September 17, 2016. 


I had the privilege of attending their home tour a few years back and LOVED it. I have to admit when I go for walks in the evening I love peering into peoples home from the street. Creepy...but I am always curious to see how other people live in their homes. 

What is so enjoyable about the Modern Home Tour is that the beautifully designed and decorated homes are open so you get to walk through and explore. It is a real design treat! This year's self-guided tour has a line-up of 5 local homes designed by local architecture, designers and builders. Chip and Shannon Wilson School of Design (Chip is the founder of Lululemon) are the non-profit partners again this year. 

I can't wait to hop in the car and explore some eye candy. Check out this website for information and to purchase tickets. 


Who is going to join me? 

DIY Outdoor Table


What fun I had working with Lowe's Canada to create a Backyard on a Budget! But it didn't come without it's challenges. Being the adventurous DIYer, I decided to build a table. My husband was skeptical and instructed me not to sell our old glass patio table until I was actually finished my DIY one. 

Pfffttt... he of little faith.


 I searched the web to find a table that I liked with clear instructions and one that didn't require fancy power tools. 

 I chose this one from Shanty 2 Chic, which was featured on Ana White's blog along with clear instructions! 


Using an inherited mitre saw and a cordless power drill, which I discovered during my project had a battery pack that drained quickly, I managed to build a solid and heavy table!


While it looks fabulous, I learned a few things along the way. 

Tip #1: Using good working and quality power tools makes a huge difference. 

I managed to use what I had, but boy it would have been amazing to use power tools that cut precisely! My dad came to help me with our mitre saw which he gave to me when they downsized. He knew what angle to cut the wood as the mitre saw does not cut at a 45 degree angle when it says it does. He was able to fudge the angle so it worked. Even with his adjustments it wasn't perfect. Since this table was for outdoors I didn't really care.

Tip #2: Use good quality wood!

 I can't stress that enough. I used 2X4's the cheapest wood I could find. I spent over an hour sorting through the piles of wood at Lowe's looking for straight pieces. Even with all that time sorting my wood warped after it was assembled and stained. I have a bit of a tilt which is fixed with a wood shim under one side of the table. The table top pieces also "waved" a bit. It all adds to the rustic charm of the table though.


Tip #3: Stain a scrap piece of wood before staining your table

Even though I did do that to sample various stains I had in my collection, I still ended up staining the table darker than I thought because I attempted to "touch" up a spot which you can do with paint but not with stain! I learned that the hard way. I ended up with blotchy dark shiny spots and had to sand and add another layer of stain which resulted in a darker colour.


For the stain I used Minwax's Polyshade in Espresso finish.


Minwax kindly provided me with a few can of stains in a variety of shades 18 months ago and I had yet to use them. As an oil-based stain, I found Polyshades more challenging to work with than water based stains. This has only been my second staining project ever, so truthfully I have only used a water based stain once. Frankly, staining SCARES me. I am a paint girl and know almost everything to know about paints but stain is a mystery to me! Polyshades did end up having a nice deep rich colour because it has a built-in clear coat.  Even though Polyshades has a built in clear coat, I still applied 4 coats of a clear coat that was formulated for outdoor use. Now I hope the table can withstand the rain we get our west.

This was a fun challenge and I have to admit I would LOVE to improve my woodworking skills. My inspiration is Chris Kauffman from Gray House Furniture who is a woodworking wonder woman! You have to follow her on Instagram: @chris_kauffman  How I would love to be able to whip up wood working projects like she does, she makes it look so easy.

Now if only we can get some summer weather here out west so we can really get better use out of our newly decorated outdoor space!


Backyard on a Budget Reveal!

Finally after weeks of working on my DIY table I can reveal our patio that I created with the help of Lowe's Canada. My challenge was to create a Backyard on a Budget with $750. I wanted a wooden table but to purchase one readymade would have blown the budget. Why not build one! It was ambitious, but I managed to create one with supplies from Lowe's for under $100! There were DIY setbacks, namely staining problems. More on that later!

After browsing Lowe's website I decided upon the Outdoor Treasures wicker Severson chair with the seat pad. Each chair with cushion came to $90. I happened to come across a sale when I purchased them where I paid no sales tax, so I managed to get them 12% off! They are comfortable to sit on, they stack and help create the warm inviting look I was going for with our outdoor space. (But if you hurry they are on sale right now!) 

The cost of the wood for the table was $75. That left me with a bit of wiggle room to buy a few accessories and plants. I purchased 3 copper lanterns with battery operated candles. Having a southern exposure, any candle that sits on the patio melts in the heat. Since I have a bit of a black and white weakness, I added two outdoor pillows in a trellis pattern.  Then I had fun creating a succulent planter for the tabletop using a planter I already had. Using some old plastic planters I had kicking around, I freshened them up with some spray paint and filled them with a few plants such as potato vine, coleus and petunias from Lowe's garden center to give some colour.  Patio string lights that I had added that layer of ambience. You can buy similar lights at Lowe's such as these.

My family enjoys hanging out on the patio now! If only we could get rid of the mosquitoes! 

Here is the before:


The after:


I love the Allen + Roth Greek Key pillows - they are a great deal right now - $10 off!


Lowe's selection of lanterns are to die for. It was hard to choose! And I love how the succulents are surviving and thriving on the table! The cost of the succulents in the planter was under $10!


Petunias are my favourite annual to grow in pots and the added chartreuse colour from the potato vine and coleus is just what the patio needs!


I love how the patio feels at night with the lanterns all aglow and the lights turned on!


* Lowe's Canada provided me with a gift card to create this Backyard on a Budget.